Having done with few basic implementations in Tridion like Dreamweaver templating, C# TBBs , I felt the need to move on to develop more sophisticated solutions for my project needs and have more control over customization , What Item gets added to Package, Make changes to the very special Output item, call different utilities/routine functions to perform a particular task, control even the resolving and rendering process and what not…
The first step in developing such more , and little advanced , sophisticated solutions would be to learn and implement .Net Assemblies.
Firstly, Acquaint yourself well with the basics of .Net Assembly here.
Let’s get movin’…Our Goal :
- Add the Publish Target info to Package, i.e. The Target ( staging, www) where a user has currently published the Item (Component, Pages…)
- Add Publication Metadata info to Package
STEP 1:
- Create a C# Class Library project in Visual Studio
- Add the necessary assembly references and using statements
using Tridion.ContentManager.CommunicationManagement;
using Tridion.ContentManager.ContentManagement.Fields;
using Tridion.ContentManager.Templating;
using Tridion.ContentManager.Templating.Assembly;
STEP 2:
Give your Class a meaningful name and decorate it with the Attribute: TcmTemplateTitle as seen below :
![]()
NOTE:
- The class above is Inheriting another class: TemplateBase. Check here more about this class and the various functions that comes in handy with this.
- TcmTemplateTitle represents the NAME of the TBB that will be created in CMS on uploading the Assembly.
STEP 3:
Now override the Transform method and add your custom logic as per your requirement. Here our goal is to add the Publish Target and Publication’s Metadata info to the Package.
public override void Transform(Engine engine, Package package)
{
    // Call the Initialize method of TemplateBase to set the
    // Engine and Package variables: m_Engine & m_Package, which are used later
       Initialize(engine, package);
       string _publishTarget = string.Empty;
       if (engine.PublishingContext.PublicationTarget != null)
           {
              _publishTarget = engine.PublishingContext.PublicationTarget.Title;
           }
      // Add the Publish Target choosen by User to Package
      m_Package.PushItem("PublishTarget", m_Package.CreateStringItem(_publishTarget));
      // This function will push the Publication's metadata to Package
      AddPublicationMetaDataToPackage();
}
private void AddPublicationMetaDataToPackage()
{
    // GetPublication() method is present inside our Base Class: TemplateBase
    // This will simply get the Publication to which the Published Items belong
    Publication scopePublication = GetPublication();
    // Check if the Publication has a Metadata associated with it
     if (scopePublication.Metadata != null)
       {
          // Using ItemFields class
          ItemFields publicationMetadataFields = new ItemFields(
                      scopePublication.Metadata, scopePublication.MetadataSchema);

         // Iterate over each Field
         foreach (ItemField metadataField in publicationMetadataFields)
            {
                if (metadataField is TextField)
                   {
                      TextField textfield = metadataField as TextField;
                       if (textfield.Value != null)
                         {
                           m_Package.PushItem(textfield.Name, m_Package.CreateHtmlItem(textfield.Value));
                         }
                    }
             }
        }
}
NOTE:
- You can Look for different field types such as : ComponentLinkField, MultiLineTextField, NumberField etc.. depending on the type of fields declared in the Publication’s Metadata Schema.
- Refer to this blog post for more information on how to read different field types.
That was it. We are ready to deploy this Class Library DLL to CMS server.
STEP 4:
There are three ways of uploading your DLL onto CMS server, Although all of these utilize the same TcmUploadAssembly.exe executable.
- Use POST BUILD EVENT COMMAND LINE option in Visual Studio, you can reach there as: Right Click Project > Properties > Build Events. There you can see the ‘ post build event command line ‘ box as shown below:
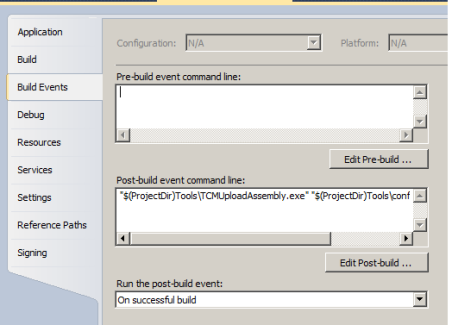
Notice that the Option: ‘ Run the post-build event ‘ is set to ‘ On successful build ‘
- Run manually the TcmUploadAssemble.exe using the command prompt
TCMUploadAssembly.exe config.xml Assembly_Name.dll
-
The different Parameters are detailed Below to be used in config.xml:
  /folder:     TcmURI of the folder where the corresponding Template generated wil be stored
 /targeturl:   The Content Manager Explorer URL

 /username:    provide a different user name

 /password:    provide a different password

 /verbose      option shows extra debug information.

 /uploadpdb:   set this to true to enable debugging of your .Net Assembly

 /timeout  :   Amount of time in seconds for uploading of .Net Assembly. Default is 100 seconds
Sample config.xml file:

- Lastly, use the Visual Studio Add-in. Check this link for more details.


On Successful upload of the Assembly, Check the Folder ( Whose TcmURI was supplied in config.xml ) , a TBB is created as shown below:

Now you can go ahead and :
- Create Assemblies which read and push the Structure Group, Page Metadata onto Package ,
- Create Assemblies that manipulate Categories, Keywords etc…
Hope you enjoyed this post. Comments and suggestions are welcome !!!


Great Article! It gives me some light in the tunnel!
LikeLike
Hey Anonymous, Great to know this article helped you. Your Suggestions/feedback are always welcome.
LikeLike
Very detailed article and I have referenced it many times.
Good work Nitesh.
LikeLike
Hi there, I found your website via Google whilst looking for a similar subject, your site came up, it seems to be great. I’ve bookmarked it in my google bookmarks.
LikeLike